Step1:设置 sip.conf
root@Ubuntu:/etc/asterisk# vim sip.conf
[general] //类似与全局变量
context = default
srvlookup = yes //DNS SRV记录查询
[111]
secret=aaa //密码,随意设置
port=5060 //SIP端口地址
type=friend //类型为friend
host=dynamic //要求号码注册,以便Asterisk可以知道如何找到电话
qualify = yes //确认远端设备是否可达
nat = no //如果一个号码在NAT设备后面,例如防火墙,配置为yes
context = internal //定义了指令的地点,用于控制电话的权限,及如何处理此号码的呼入呼叫。
canreinvite = no //让Asterisk媒体通道经过自己,而不允许RTP信息直接在端点之间传送
;-----------华丽的分割线--------------
[222]
secret=aaa
port=5060
qualify = yes
nat = no
context = internal
canreinvite = no
type=friend
host=dynamic
Step2:设置extensions.conf
root@Ubuntu:/etc/asterisk# vim extensions.conf
[internal] //这里的internal和sip.conf里的context相同,可修改
exten => 1001,1,Dial(SIP/111)
exten => 1002,1,Dial(SIP/222)
Step3:打开Asterisk
root@Ubuntu:/home/blackhole# asterisk -crvvvvv
...
...
Ubuntu*CLI>
Step4:设置X-lite
点击软件上方三角形ShowMenu
再点开SIP Account Settings,设置新账户
如图所示:
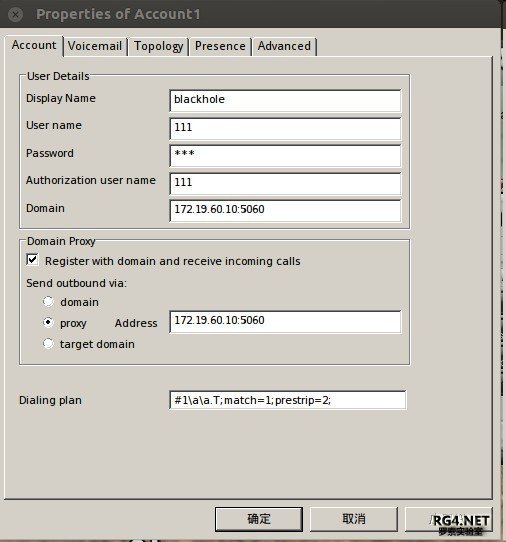
DisplayName可随意填写
User name 和Authorization user name填在sip.conf里面设置的名字我的是111就填111了
Domian就是本机的IP地址,proxy也是 但是记得加端口号
设置完点确定就OK了
此时 应该就能够看到
-- Registered SIP '111' at 172.19.60.10:45738
[Apr 15 20:33:15] NOTICE[1154]: chan_sip.c:24728 handle_request_subscribe: Received SIP subscribe for peer without mailbox: 111
Ubuntu*CLI>
表示已经111已经连接上
此时你可以试试拨打1001
你会看到111在拨打自己
== Using SIP RTP CoS mark 5
-- Executing [1001@internal:1] Dial("SIP/111-00000023", "SIP/111") in new stack
== Using SIP RTP CoS mark 5
-- Called SIP/111
-- SIP/111-00000024 is ringing
-- SIP/111-00000024 is ringing
== Spawn extension (internal, 1001, 1) exited non-zero on 'SIP/111-00000023'
Ubuntu*CLI>
Step5:设置eyeBeam
在此解释一下X-lite和eyeBeam其实是相同的,只是eyeBeam不能使用视频而X-lite可以
我只是用他们做个测试
所以设置和eyeBeam是相同的
设置好后
-- Registered SIP '222' at 172.19.60.10:15934
[Apr 15 20:42:55] NOTICE[1154]: chan_sip.c:24728 handle_request_subscribe: Received SIP subscribe for peer without mailbox: 222
Ubuntu*CLI>
这样就可以呼叫X-lite啦
拨打1001试试
当然也可以用X-lite拨打eyeBeam
== Using SIP RTP CoS mark 5
-- Executing [1001@internal:1] Dial("SIP/222-00000027", "SIP/111") in new stack
== Using SIP RTP CoS mark 5
-- Called SIP/111
-- SIP/111-00000028 is ringing
-- SIP/111-00000028 is ringing
Ubuntu*CLI>
附图:

这样就算是成功了吧
注:如果extensions.conf被重新编写了 一定要记得在CLI那里reload一下
重新编写sip.conf就sip reload
(sukhoi27smk)