用户登录,一般是所有程序都有的基础功能,在IOS中的登录页面用到了哪些控件,怎么布局才能提高用户体验。
在做这个Demo前,参考并分析了其它应用的登录特点,主流的应用都是通过UITableView来设置布局,整体页面也比较简单,但是非常实用,就像下面的这个登录
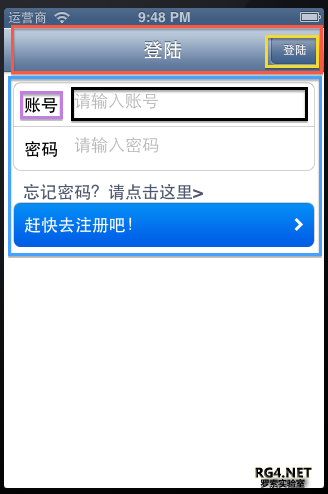
分析上面的登录窗口,可以发现是什么控件来布局的
红色:UINavigation
黄色:UIBarButtonItem
紫色:UILable
蓝色:UITableView,UITableViewCell
黑色:UITextField
知道了整个登陆的布面,接着就是怎么样实现这种布局的形式了。
1、头布导航
因为是在启动时就直接到登录页面,所以在AppDelegate中就加入了UINavigationController来管理导航
- self.window = [[UIWindow alloc] initWithFrame:[[UIScreen mainScreen] bounds]];
- self.viewController = [[ViewController alloc]
- initWithNibName:@"ViewController" bundle:nil];
- self.rootController = [[UINavigationController alloc]
- initWithRootViewController:self.viewController];
- self.window.rootViewController = self.rootController;
在登录的窗口里,设置导航的title为登陆,并且用到了第二个控件UIBarButtonItem,在登录View中viewDidLoad添加代码
创建了一个right的登录按钮,并且绑定事件为doLogin
- self.navigationItem.rightBarButtonItem = [[UIBarButtonItem alloc]
- initWithTitle:@"登陆"
- style:UIBarButtonItemStylePlain
- target:self action:@selector(doLogin)];
2、主体部分
在主体部分中,大部分都是对UITableView和UItabViewCell的操作,首先在viewDidLoad添加一个tableView
- UITableView *loginView = [[UITableView alloc]
- initWithFrame:CGRectMake(0, 0, 320, 480) style:UITableViewStyleGrouped];
- loginView.delegate = self;
- loginView.dataSource = self;
- loginView.scrollEnabled = NO;
- loginView.backgroundView = [[UIImageView alloc]
- initWithFrame:CGRectMake(0, 0, 320, 480)];
- [self.view addSubview:loginView];
在代码中,创建了一个UITableView,并设置了tableView的委托,数据源,并且设置了背景为空白,还有scrollEnabled=NO,锁定为不能滚动,最后添加到self.view中,创建好了tableView,现在需要实现成图片中看到的样子。
先分析分析,看这个tableView都设置了哪些东西
1:这是一个样式为Grouped的tableView
这个在viewDidLoad中已经实现了。
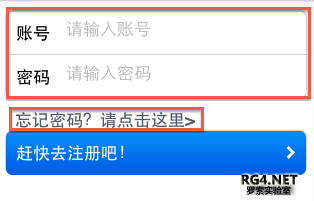
2:tableView共有三行,并且被分为了2组,第一组2行,第二组1行
设置一个只有3行,并且分为2组的tableView代码
- - (NSInteger)numberOfSectionsInTableView:(UITableView *)tableView
- {
- return 2;
- }
- - (NSInteger)tableView:(UITableView *)tv numberOfRowsInSection:(NSInteger)section
- {
- if (section == 0)
- return 2;
- else
- return 1;
- }
3:在第一组的cell,没有title,第二组cell中多了一个title
-
- - (NSString *)tableView:(UITableView *)tableView
- titleForHeaderInSection:(NSInteger)section
- {
- if (section == 1)
- return @"忘记密码?请点击这里>";
- return nil;
- }
-
-
- - (CGFloat)tableView:(UITableView *)tableView
- heightForHeaderInSection:(NSInteger)section
- {
- if (section == 1)
- return 20;
- return 0;
- }
4: 第一组的2行,不能点击,第二组中的cell可以击,并转到注册页面
设置第一组的cell不能点击,是在另一个方法中设置了cell.selectionStyle = UITableViewCellSelectionStyleNone 也就是 生成cell的方法,设置点击的方法
- - (void)tableView:(UITableView *)tableView
- didSelectRowAtIndexPath:(NSIndexPath *)indexPath
- {
-
- if (indexPath.section == 1 && [indexPath row] == 0)
- {
- [self doRegister];
- }
- }
5:设置登录框内容
-
- - (UITableViewCell *)tableView:(UITableView *)tv
- cellForRowAtIndexPath:(NSIndexPath *)indexPath
- {
- static NSString *CellWithIdentifier = @"loginCell";
- UITableViewCell *cell = [tv dequeueReusableCellWithIdentifier:CellWithIdentifier];
- if (cell == nil) {
- cell = [[UITableViewCell alloc]
- initWithStyle:UITableViewCellStyleDefault reuseIdentifier:CellWithIdentifier];
- }
- if (indexPath.section == 0) {
- switch ([indexPath row]) {
- case 0:
- cell.textLabel.text = @"账号";
- cell.selectionStyle = UITableViewCellSelectionStyleNone;
- self.nameField =
- [[UITextField alloc] initWithFrame:CGRectMake(60, 7, 230, 30)];
- [self.nameField setBorderStyle:UITextBorderStyleNone];
- self.nameField.placeholder = @"请输入账号";
- self.nameField.clearButtonMode = YES;
- self.nameField.returnKeyType = UIReturnKeyNext;
- [cell.contentView addSubview:self.nameField];
- break;
- default:
- cell.textLabel.text = @"密码";
- cell.selectionStyle = UITableViewCellSelectionStyleNone;
- self.pwdField =
- [[UITextField alloc] initWithFrame:CGRectMake(60, 7, 230, 30)];
- [self.pwdField setBorderStyle:UITextBorderStyleNone];
- self.pwdField.placeholder = @"请输入密码";
- self.pwdField.clearButtonMode = YES;
- self.pwdField.returnKeyType = UIReturnKeyDone;
- [cell.contentView addSubview:self.pwdField];
- break;
- }
- } else {
- cell.textLabel.text = @"赶快去注册吧!";
- cell.accessoryType = UITableViewCellAccessoryDisclosureIndicator;
- }
- return cell;
- }
到此,登录框的所有布局内容都搞定了,但是在实际中,根据UI的设计,所用到的布局控件也会不一样,在这个Demo中,还有很细节的地方要改,因为本人也是新手,所以就不班门弄斧了,大牛到此看到不对的地方,还望评论指出。
demo下载:http://download.csdn.net/detail/qq5306546/4855824
(qq5306546) |