|
If you’re in need of writing a DirectShow filter and you’ve never done it before you might be interested in reading the following article. It explains how to configure all the necessary stuff in Visual C++ to make a very simple DirectShow filter. PrerequisitesLet’s sum up what must be done before you can start dealing with DirectShow filters. First you really need to have a working Visual Studio with all updates and service packs installed. I believe that most people use at least VS2003 or newer version so I won’t be dealing with VS6.0 anymore. All examples and pictures are taken from a VS 2005. You should also be familiar with how C++ works and with the concept of libraries and linking. If you’re not, you don’t need to read this article anymore. I strongly recommend to have the latest Platform SDK (also known as Windows SDK). You should also use specific SDK for your OS = not to use Vista SDK with Windows XP etc. You can visit www.microsoft.com to download e.g. Windows SDK for Vista. Since DirectShow has been separated from the DirectX SDK it is not really necessary to have DX SDK installed but if you’re also concerned with 3D graphics and stuff you might also consider installing it. Microsoft has developed a set of base classes to support the development of DS filters that are now a part of Window SDK and are located within the SDK in the {SDK}\Windows\v6.0\Samples\Multimedia\DirectShow\BaseClasses directory. Usually the library is configured without MFC support. If you’re familiar with MFC and would like to take advantage of the MFC library you might considering making your own builds of the baseclasses. To get more info on this issue try reading this article. If you are developing with VS2005 you should be aware that it requires a new runtime package that is not currently present on all systems and if you are linking MFC as shared library your applications won’t work unless the user installs the SP1 Redistributable Package. To avoid this you should simply use MFC as static libraries. I would also recommend building all 4 types of baseclasses library :
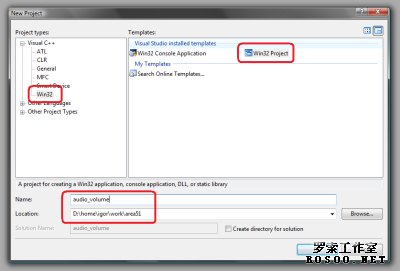
Suffix *u means unicode builds, *s means MFC static, *d means debug. The baseclasses library from the Windows SDK contains an entry point named "DllEntryPoint". I’ve created a function named "FilterDllMain" that also initializes MFC properly. If you see these names appear don’t get confused - they both actually mean the same. Then you need to add the include and lib path to Visual Studio so you won’t have to specify full path to headers and .lib files for each filter. You can do this by opening Tools -> Options. And then add the folder where baseclasses sources are kept just as on the following image. I’m using my own build of baseclasses that is named "libMonoDShow". 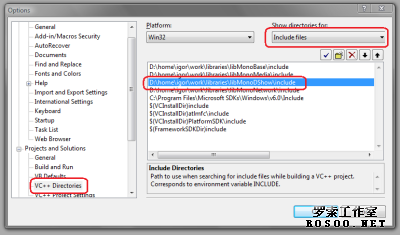 图片1 And in the same manner add also path to the "Library files". New ProjectStart a new project by clicking File -> New -> Project… and select Win32 / Win32 Project. Select some folder to put the filter in and also enter some name. In this tutorial we’ll be writing a simple audio processing filter so I’ve named the project "audio_volume".
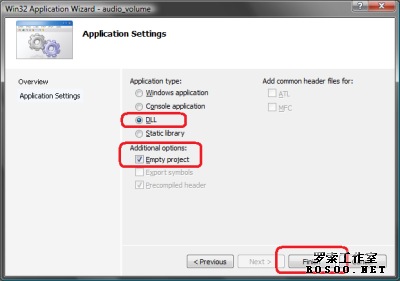
In the following page of the wizard select DLL as application type and make it an empty project.
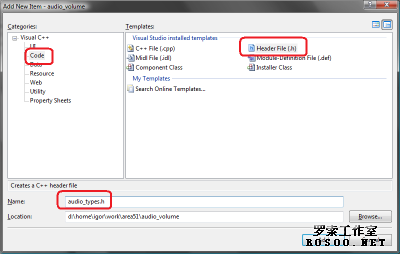
Writing The FilterNow we should have an empty project created so it’s time to add some stuff. It is always a good thing to have a header file with all the filter-specific stuff like CLSID, interface IIDs and interface definitions or configuration structures. So let’s add one such file. 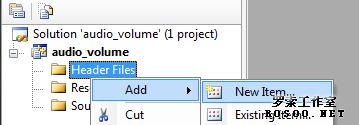 图片1 Use the Tools -> Create GUID ("C:\Program Files\Microsoft Visual Studio\Common\Tools\GUIDGEN.EXE")tool to generate a class ID for the new filter. I prefer using the third type - the one with "static const struct GUID ….". Use some proper name such as "CLSID_AudioVolume" for the newly generated GUID. Once this is done the file should look like this :
Now it’s time to create the header file for the filter itself so add a new .H file and save it as "audio_filter.h". Insert the following code into the "audio_filter.h" file :
This should be quite enough for the tutorial. All methods will be explained later. Now add a CPP file where the filter implementation should be. Save it as "audio_filter.cpp" and write the following code :
These were just plain constructor, destructor and a static method to provide instances of our audio filter. Now we need to deal with CTransformFilter virtual methods. When the upstream filter connects to our audio processing filter it must first negotiate the proper media type. For the purpose of this tutorial we only accept 16-bit raw PCM audio data so the AudioVolume::CheckMediaType might look like this :
Our filter does not encode/decode or scramble the data so the output should also be PCM audio.
Our filter should offer exactly the same media type for the output so we keep a copy of the input type.
We need to make clear how large buffers should be used when delivering data downstream. This might need more sophisticated solution but for this tutorial this can be solved easily :
And the final phase - audio processing itself. We only multiply each PCM sample by the factor of 0.5. That means we’re amplify the signal by -6.0205 dB.
That’s for the functionality. Now we need to describe the filter so the GraphBuilder can locate and insert the filter if necessary. Registry InformationIt is a good habit to create a special file for the purpose of registry information and DLL entry points. I use to follow the "*_reg.cpp" pattern so in this tutorial I’d create an "audio_reg.cpp" file and insert the following structures. I strongly recommend to use standard merit values and to use MERIT_UNLIKELY or MERIT_NORMAL unless really necessary. You can really screw many things by entering stupid values here.
Since DirectShow filters are COM objects they should expose the functions to register and unregister the library. If you would ever need to perform some special tasks (e.g. registering file extensions) this is the place.
HeadersNow create a file named "headers.h" and put the following inside :
and include the header.h file in all *.cpp files. External SymbolsNow we’re done with programming but we still need to specify a few things. First - each DLL library (whether named .dll or .ax) should expose some functions. COM libraries should expose at least 4 functions :
the first 2 have been declared in the previous paragraph and the last 2 are implemented by the baseclasses library. But we need to make it clear to the linker that we really want to expose them so we should add a new item to the project - "Module-Definition File (.def)" and call it "audio_volume.def". Edit it’s content so it would look like this :
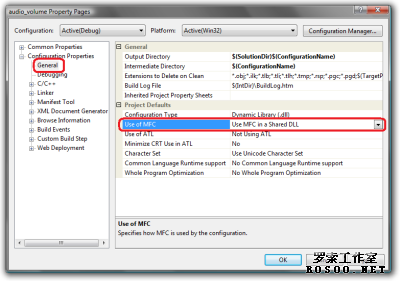
Project OptionsAnd the last few touches are done in the project options dialog. In the Configuration Properties -> General page select the proper MFC usage type.
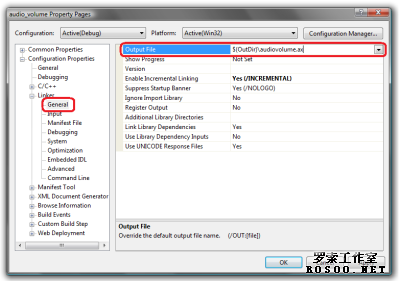
In the Linker -> General page enter the desired output file name.
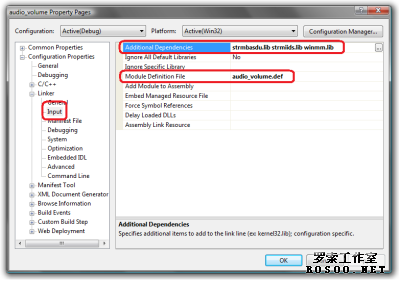
In the Linker -> Input page add the baseclasses libraries and also "strmiids.lib" and "winmm.lib" and make sure the module definition is valid.
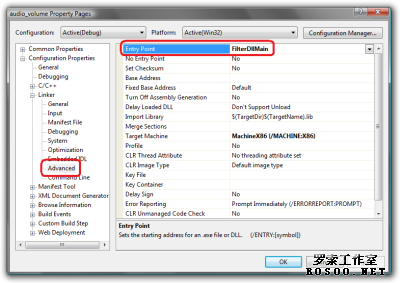
And finally in the Linker -> Advanced page enter the proper entry point. If you are using MFC-enabled baseclasses as I was, you might be using the same function as I am - "FilterDllMain". If you’re using the original baseclasses library you might enter DllEntryPoint@12 instead.
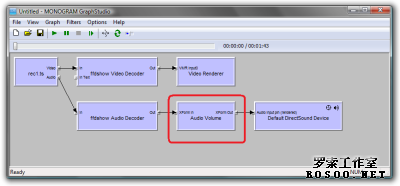
Now you should be able to build the filter TestingYou can test the filter very easily using either GraphStudio or GraphEdit tools. I’ve constructed a simple graph like the following. Try it run with and without the "Audio Volume" filter and you should hear the effect.
Conclusion
Congratulations for reading this far |