|
There's nothing wrong with the command-line. For many of us, it's one of the best reasons for using Linux. You can accomplish almost anything by typing things out, and command-line tools will often provide an unprecedented degree of control over how they can be run. But the command-line isn't for everyone, and there there's a surprising number of Linux users who find it unfathomable and intimidating, perhaps even a reason to avoid the Linux completely. And while it's true that you no longer have to use the command-line if you don't want to, it still means that you're missing out on some great utilities. And this is where Qt can save the day. It's the perfect tool for creating a warm and fuzzy GUI around your favourite command-line tools. It doesn't require any ace programming skills, and only a little bit of effort, but in the process you can help your command loathing friends and make your own contribution to open source application development. Creating GUIs for command line tools is one of the best ways of getting started! If you already finished our previous Qt Creator code project, how to create your own media player, you're more than ready to tackle this... If there's one tool that badly needs a GUI it's FFMPEG. FFMPEG is an incredible command-line application that can convert video and movie files from one format to another. It's also incredibly complex. Several developers have already tried to create a GUI for this tool, but FFMPEG development moves at such a rate that it can be difficult to keep on top of all the additional components and altering syntax used for the various option. We're going to build our own FFMPEG GUI, but the reason for this tutorial isn't so much helping people access the wonders of FFMPEG. This tutorial will show you how easy it is to create a GUI for almost any command-line tool just by replacing a few lines of codes, and as a result, perhaps help scratch your own itch.
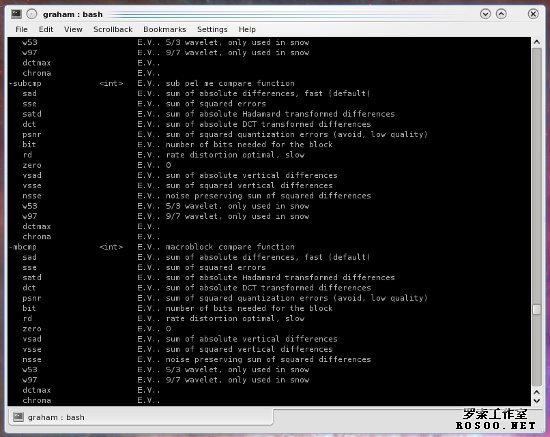
Typing 'ffmpeg -h' should only done by the strong willed and those who aren't intimidated by hieroglyphics Application designWe're going to make the assumption that you've got Creator up and running, and that you're relatively content using the development environment. If not, take a look at our earlier tutorial for a refresher course. After launching the application, create a new project and use the 'Qt Gui Application' template and leave the other options at their default value. As with the previous tutorial, the place to start with development is the GUI. Click on the '.ui' file and the Designer view will appear. To start with a blank canvas, delete the menu bar, toolbar and status bar from the view by selecting them in the object view on the top right of the window, right clicking on each widget and choosing delete from the menu that appears. The GUI layout for our application is obviously going to depend on the command line tool you want to run. But for our FFMPEG example, we're going to try and keep things as open and modifiable as possible. We'll need a button for adding the source file to be converted, along with a field to show the location of this file. We'll need some way of selecting between the end formats of the conversion process, and we'll also need some way of showing the results of the FFMPEG command. We'll also need another button that's going to kick-start the whole process off. But the main section of the user-interface is going to be taken up by the FFMPEG options we'll choose to make user editable. There's no way we want to expose the average user to the hundreds of options that make up FFMPEG, so these will reflect the most common, simple options for each use.
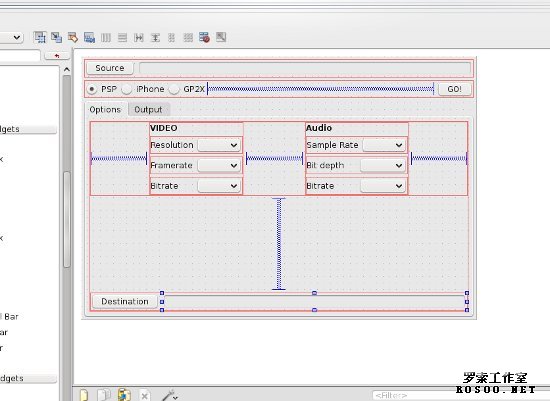
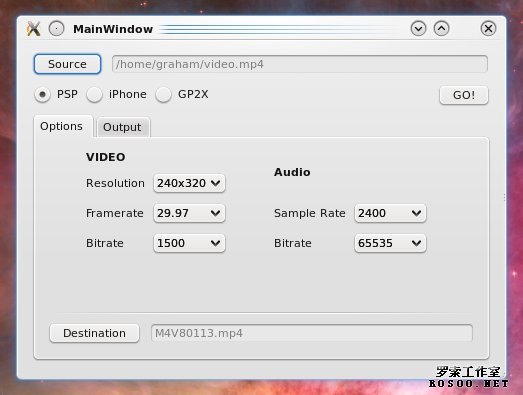
We're aiming for a layout that makes best use of the space. Which is why we've opted to hide the command line output on a different page GUI buildingDrag two push buttons onto the blank canvas from the Button widget list on the left and double click on each to change their name. One needs to be called 'Source', while the other needs to say something like 'Go!' for triggering the conversion process. Alternatively, you could use icons instead of text, or even both if you feel that would be an improvement. Now add a Line Edit widget from the Inputs list and click on the 'enabled' property in the bottom left panel to disable it. As the Line Edit widget is interactive – by default, the user can type into it – we want to disable this feature and only use the widget to display the source location of the file we want to convert. If you'd rather let user type or modify the name and location of the file manually, leave this field enabled. We also want to provide an easy way for the user to select an output format. We opted for a series of radio buttons, one for each format, and these can be added by dragging the Radio Button widget from the palette. The advantage with this approach is that only one can be selected at a time, which is exactly the kind of behaviour we require. Each radio button also needs to have its label changed to reflect the device that the FFMPEG output would be appropriate for. Selecting PSP as an output device, for example, would disable iPhone output and GP2X output. To make the best use of the available space, we're going to use a tab widget to hold the remaining parameters. Just like tabbed web pages in a browser, this enables the user to switch between two different views for a section of the GUI. We're going to use one tab to hold the main parameters we want to expose, and the other to hold the raw command output from FFMPEG. This should mean that the user doesn't have to see the mess of FFMPEG output unless they switch tabs. Drag the tab widget from the Containers list in Creator onto the canvas, and while selected, click the 'currentTabText' property in the property list to change the text displayed on each tab. We chose 'Options' and 'Output'. Any widgets dragged into the tab widget will only be displayed on the current tab, so, for the Options tab, we added five combo boxes along with five labels. Combo boxes are the most user-friendly option for a tool like FFMEG because they limit the options available to only those that will work. It's extra effort for the programmer, but that effort is saved many times over for the poor old user. With out six combo boxes, we opted to allow the configuration of the video resolution, framerate and bitrate, as well as the audio sample rate and the compression bitrate. We renamed each combo widget to make them easier to distinguish in our source code, and placed a label next to each one with a text word for each option. Beneath the combo boxes we added a couple more widgets to hold the destination file name – a button to select the file and a disabled line edit field to show the location. Finally, switch the tab widget to the next page and add a single Text Browser widget. We're going to use this to display the output of the FFMPEG command. SpacersYour application should now look fairly complicated. We need to arrange the widgets in such a way that they scale well and look evenly spaced. Qt uses a system of groups and spacers to create a layout, and it takes a little effort to get your head around the principle. It's a lot like how a DTP application handles objects. For example, to create a good layout in the options page, first shift select a label and its associated combo box, then select 'Lay Out Horizontally' from the toolbar. This will lock the two widgets side-by-side. Do this for the other pairs, then shift select the grouped pairs that change the video settings and select 'Lay Out Vertically'. This will align each pair into a column, and you need to do the same for the audio settings. We also added labels for the audio and video columns and included those in the vertical layout selection. Group selections can be tricky to get correct, but you can always 'Undo' and 'Redo' if you make any mistakes.
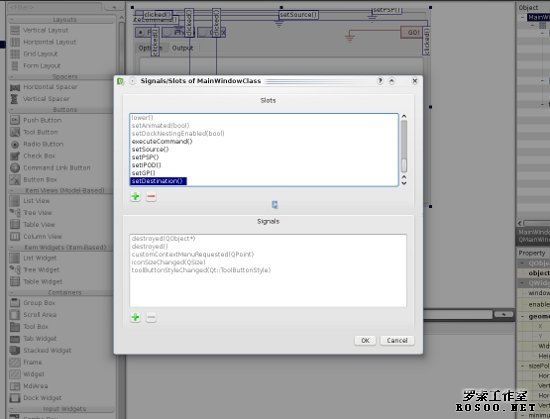
It's best to think of spacers as springs and revisit some of your old Physics text books To ensure that our GUI doesn't get overtly stretched across a large window, we need to use 'spacers'. They look a little like a spring, and you can add either a vertical or horizontal spacer from the widget palette. When you include an appropriate spacer in your horizontal or vertical layouts, your widgets will be grouped together with a section of expansive space where the spring is located. As the application window expands or contracts, this space will scale in proportion to the length of the spring. It's all a lot harder to understand in text than in application, but the result is a flexible layout system with a rather steep learning curve. We used three horizontal springs to break up the video and audio options and spacing both from the window borders and a vertical spring to break up the video and audio encoding options from the destination file location. Spacers were also used to give a little breathing space to the radio buttons. When you've got everything roughly where you need it, just select 'Lay Out in a Grid' to bind everything to the main window. You can still drag and add widgets to the layout, but if you need to make any big changes, you'll need to break this binding first. Select 'Break Layout' to perform this trick. Signals and slotsNow the part where we tie the GUI design to the program functionality we'll add in the source code. This is thanks to Qt's signals and slots mechanism we covered previously. To start with, switch to the Signals/Slots editing mode (F4), and drag a connection from the 'Go' push button to the background canvas of the window, effectively sending a signal to the MainWindow class. In the window that appears, click on the left hand Edit button to open the Signals/Slots editing window. We need to add six slots: executeCommand(), setSource(), setDestination(), setPSP(), setIPOD() and setGP(). Click OK and select the newly created 'executeCommand()' slot to the clicked signal of the Go button we're currently editing. You need to do the same for each of the other buttons we've just created slots for by connecting them to their corresponding slot. For instance, the 'clicked()' signal from the PSP radio button should be connected to 'setPSP().'
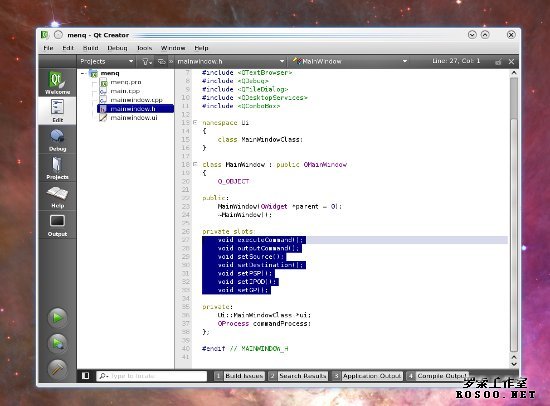
We create our own slots from the GUI that we'll need to add code for in the source code editor After completing that task, we're now finished with the Designer editing, so save the project and switch to editing MainWindow.h. We need to add several headers to the top of the file: #include <QProcess> #include <QByteArray> #include <QTextBrowser> #include <QFileDialog> #include <QDesktopServices> #include <QComboBox> Most of these are requires because we want to manipulate some of the widgets we've added to our application in Designer. Qprocess and QbyteArray are used to launch an external executable from Qt and grab the output from the command, but we'll come to that function shortly. We now need to add our definitions for the slots we're going to write. Add the following code beneath the 'public:' section:
private slots:
    void executeCommand();
    void outputCommand();
    void setSource();
    void setDestination();
    void setPSP();
    void setIPOD();
    void setGP();
Finally, we need to add a single variable to the 'private:' section of the header file. This is the object that will handle the external executable (FFMPEG) from within Qt: QProcess commandProcess;
We create our own slots from the GUI that we'll need to add code for in the source code editor ProgrammingNow we've got to the trickiest part, adding the functionality to our application. Firstly, we'll deal with 'set' functions for the three different output formats we're going to handle. Each of these will populate the combo boxes with parameters that are relevant to the device, and we'll eventually take these parameters to build the FFMPEG command-line that will create the appropriate output. Of course, we first need a working FFMPEG command for each format before we can add the values to the GUI. We've found the best FFMPEG command for converting a video that will run on a PSP, for instance, is the following:
ffmpeg -i space.mpg '-vcodec' 'libxvid' -s 320x240 -r 29.97 -b 1500 -acodec libfaac
    -ac 2 -ar 24000 -ab 65535 -f psp M4V80113.mp4 -y
We're going to take a few of these parameters and make them editable from our GUI. As we've seen with other projects, you can run methods that belong to the objects within the GUI through the 'ui' object, which is created by default with the standard Creator template. 'ui->comboResolution->clear(), for example, will execute clear on the comboResolution combo box. The great thing about the Creator integrated environment is that you can use the auto-complete function to list the available options for each object, rather than remembering what's possible. Here's our FFMPEG options transposed into the GUI in the setPSP function. It needs to be added to the bottom of the MainWindow.cpp file:
void MainWindow::setPSP()
{
    ui->comboResolution->clear();
    ui->comboFramerate->clear();
    ui->comboBitrate->clear();
    ui->comboSamplerate->clear();
    ui->comboAbitrate->clear();
    ui->comboResolution->addItem("240x320");
    ui->comboResolution->addItem("160x120");
    ui->comboFramerate->addItem("29.97");
    ui->comboBitrate->addItem("1500");
    ui->comboSamplerate->addItem("2400");
    ui->comboAbitrate->addItem("65535");
    ui->lineEdit_2->setText("M4V80113.mp4");

}
This should all be rather self explanatory. To save space, the only combo box we're adding more than one option to is the resolution box, but you can easily see how other options can be added. You also need to create the same template for both of the other presets, and place them in the 'setIPOD' and 'setGP' function slots. As we've only chosen a selection of parameters for the user to edit, we need to combine those with the other parameters in the FFMPEG command, and we're going to do that in the function that handles running the external FFMPEG command, a new function called 'executeCommand()': Executing a command
void MainWindow::executeCommand()
{
    QStringList args;

    args << "-i";
    args << ui->lineEdit->text();
    args << "-y";
    args << "-s"; args << ui->comboResolution->currentText();
    args << "-r"; args << ui->comboFramerate->currentText();
    args << "-b"; args << ui->comboBitrate->currentText();
    args << "-ar"; args << ui->comboSamplerate->currentText();
    args << "-ab"; args << ui->comboBitrate->currentText();
    args << ui->lineEdit_2->text();

    if (ui->radioButton->isChecked()){
        args << "-vcodec"; args << "libxvid";
        args << "-acodec"; args << "libfaac";
        args << "-ac"; args << "2";
        args << "-f"; args << "psp";
    }
    commandProcess.start("ffmpeg", args);

}
Here's the explanation of what's happening in the above chunk of code.. The key to running external commands from within Qt is a class called 'Qprocess.' We created our own object using this class in the header file at the end of step three, and it's now time to use it to execute FFMPEG. Using the the 'commandProcess' variable, we simply run 'start' with two variables - the command itself, and our list of arguments. We use 'QstringList' to quickly build this list of arguments, firstly from the widgets within our GUI, and then with PSP specific arguments contained within the conditional 'if' statement (ui->radioPSP->isChecked). You'll need to add further arguments for the other destination devices for the conversion process to work.
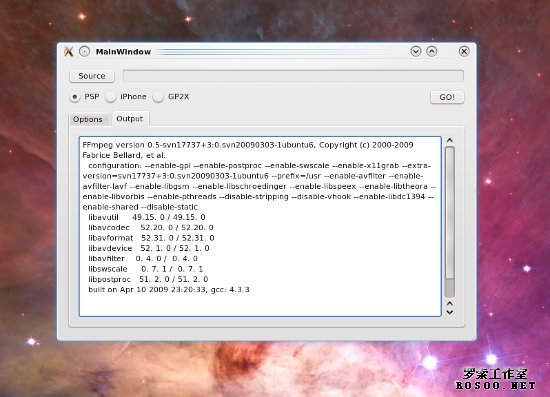
The output from the FFPMEG command will be displayed in the output tab in our main application This function is going to be executed when the user clicks on the 'Go' button we created in the GUI, and this process is automatic thanks to the signals and slots we configured earlier. But we also need to capture the output from the process so that it can be displayed in the text view and give the user some visual feedback on what's happening. Thankfully, thanks to the magic of signals and slots, Qprocess can perform exactly that trick without too much difficulty. In the MainWindow::MainWindow initialisation routine, we need to manually create the connection between the Qprocess output signals and the 'outputCommand' slot we're going use to convert the output to text so that it can be displayed. Just add the following two lines before the 'ui->setupUi' line: connect (&commandProcess, SIGNAL(readyReadStandardOutput()),this, SLOT(outputCommand())); connect (&commandProcess, SIGNAL(readyReadStandardError()),this, SLOT(outputCommand())); As you can see, there are two different kinds of output signals that are emitted from Qprocess, and we send the output from both to the same function, 'outputCommand', which we now need to add to our pool of source code:
void MainWindow::outputCommand()
{
    QByteArray cmdoutput = commandProcess.readAllStandardOutput();
    QString txtoutput = cmdoutput;
    ui->textBrowser->append(txtoutput);
    cmdoutput = commandProcess.readAllStandardError();
    txtoutput = cmdoutput;
    ui->textBrowser->append(txtoutput);

}
Here's the function that's executed when Qt detects output from the Qproccess running 'FFMPEG'. It's a little verbose because you can't make the assumption that the output from a command is text, and the output data comes in two streams – one for the standard output from the command, and another for the error output. We play it safe by copying the binary data from the stream to an array of raw bytes, before using Qt's excellent conversion routines to convert this date into a text string. This data is then appended to the text view, and we go through the same process again for the error output from the command. There isn't any easy way of grabbing both. Finally, the last step before our application is completed, is adding the two slots to deal with the source and destination file locations. These are both almost identical. Here's the slot function for the destination:
void MainWindow::setDestination()
{
    QString file = QFileDialog::getSaveFileName (this, tr("Select Destination"),
         QDesktopServices::storageLocation(QDesktopServices::MoviesLocation));
    ui->lineEdit_2->setText(file);
}
The first line creates a Qt file requester that automatically points to the system's default movie location, and because we've used 'getSaveFileName', the user will be asked for the name of a file that doesn't have to exist. This is different to the 'setSource' which does the opposite:
void MainWindow::setSource()
{
     QString file = QFileDialog::getOpenFileName(this, tr("Select Source File"),
         QDesktopServices::storageLocation(QDesktopServices::MoviesLocation));
    ui->lineEdit->setText(file);

}
After typing those last two functions in, the source code for our application is complete, and you should have a working FFMPEG GUI that can be customised to use any arguments and parameters you need. Just build and run. You should also see just how easy it would be to modify this code to work with almost any other command line tool.
No need to delve into the arcade world of FFMPEG with our Qt-based frontend |

