虽然现在能通过交叉环境编译程序,并push到Android上执行,但那只是console台程序,是不是有些单调呢?下面就要看如何通过 Linux的 framebuffer 技术在Android上画图形,关于Linux的framebuffer技术,这里就不再详细讲解了,请大家google一下。
操作framebuffer的主要步骤如下:
1、打开一个可用的FrameBuffer设备;
2、通过mmap调用把显卡的物理内存空间映射到用户空间;
3、更改内存空间里的像素数据并显示;
4、退出时关闭framebuffer设备。
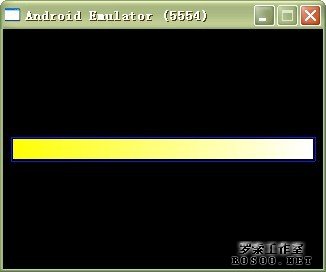
下面的这个例子简单地用framebuffer画了一个渐变的进度条,代码 framebuf.c 如下:
- #include <unistd.h>
- #include <stdio.h>
- #include <fcntl.h>
- #include <linux/fb.h>
- #include <sys/mman.h>
-
- inline static unsigned short int make16color(unsigned char r
- , unsigned char g, unsigned char b)
- {
- return (
- (((r >> 3) & 31) << 11) |
- (((g >> 2) & 63) << 5) |
- ((b >> 3) & 31) );
- }
-
- int main() {
- int fbfd = 0;
- struct fb_var_screeninfo vinfo;
- struct fb_fix_screeninfo finfo;
- long int screensize = 0;
- char *fbp = 0;
- int x = 0, y = 0;
- int guage_height = 20, step = 10;
- long int location = 0;
-
-
- fbfd = open(”/dev/graphics/fb0″, O_RDWR);
- if (!fbfd) {
- printf(”Error: cannot open framebuffer device.\n”);
- exit(1);
- }
- printf(”The framebuffer device was opened successfully.\n”);
-
-
- if (ioctl(fbfd, FBIOGET_FSCREENINFO, &finfo)) {
- printf(”Error reading fixed information.\n”);
- exit(2);
- }
-
-
- if (ioctl(fbfd, FBIOGET_VSCREENINFO, &vinfo)) {
- printf(”Error reading variable information.\n”);
- exit(3);
- }
-
- printf(”sizeof(unsigned short) = %d\n”, sizeof(unsigned short));
- printf(”%dx%d, %dbpp\n”, vinfo.xres, vinfo.yres, vinfo.bits_per_pixel );
- printf(”xoffset:%d, yoffset:%d, line_length: %d\n”
- , vinfo.xoffset, vinfo.yoffset, finfo.line_length );
-
-
- screensize = vinfo.xres * vinfo.yres * vinfo.bits_per_pixel / 8;;
-
-
- fbp = (char *)mmap(0, screensize, PROT_READ | PROT_WRITE, MAP_SHARED,
- fbfd, 0);
-
- if ((int)fbp == -1) {
- printf(”Error: failed to map framebuffer device to memory.\n”);
- exit(4);
- }
- printf(”The framebuffer device was mapped to memory successfully.\n”);
-
-
- memset(fbp, 0, screensize);
-
- y = (vinfo.yres - guage_height) / 2 - 2;
-
- for (x = step - 2; x < vinfo.xres - step + 2; x++) {
- location = (x+vinfo.xoffset) * (vinfo.bits_per_pixel/8) +
- (y+vinfo.yoffset) * finfo.line_length;
-
- *((unsigned short int*)(fbp + location)) = 255;
- }
-
- y = (vinfo.yres + guage_height) / 2 + 2;
-
- for (x = step - 2; x < vinfo.xres - step + 2; x++) {
- location = (x+vinfo.xoffset) * (vinfo.bits_per_pixel/8) +
- (y+vinfo.yoffset) * finfo.line_length;
-
- *((unsigned short int*)(fbp + location)) = 255;
- }
-
- x = step - 2;
- for (y = (vinfo.yres - guage_height) / 2 - 2;
- y < (vinfo.yres + guage_height) / 2 + 2; y++) {
- location = (x+vinfo.xoffset) * (vinfo.bits_per_pixel/8) +
- (y+vinfo.yoffset) * finfo.line_length;
-
- *((unsigned short int*)(fbp + location)) = 255;
- }
-
- x = vinfo.xres - step + 2;
- for (y = (vinfo.yres - guage_height) / 2 - 2;
- y < (vinfo.yres + guage_height) / 2 + 2; y++) {
- location = (x+vinfo.xoffset) * (vinfo.bits_per_pixel/8) +
- (y+vinfo.yoffset) * finfo.line_length;
-
- *((unsigned short int*)(fbp + location)) = 255;
- }
-
-
- for ( x = step; x < vinfo.xres - step; x++ ) {
- for ( y = (vinfo.yres - guage_height) / 2;
- y < (vinfo.yres + guage_height) / 2; y++ ) {
- location = (x+vinfo.xoffset) * (vinfo.bits_per_pixel/8) +
- (y+vinfo.yoffset) * finfo.line_length;
-
- if ( vinfo.bits_per_pixel == 32 ) {
- *(fbp + location) = 100;
- *(fbp + location + 1) = 15+(x-100)/2;
- *(fbp + location + 2) = 200-(y-100)/5;
- *(fbp + location + 3) = 0;
- } else {
- unsigned char b = 255 * x / (vinfo.xres - step);
- unsigned char g = 255;
- unsigned char r = 255;
- unsigned short int t = make16color(r, g, b);
- *((unsigned short int*)(fbp + location)) = t;
- }
- }
-
-
- usleep(200);
- }
-
- munmap(fbp, screensize);
- close(fbfd);
-
- return 0;
- }
注意,在Android环境,framebuffer设备不是象linux一样的 /dev/fb0,而是 /dev/graphics/fb0 ,
- fbfd = open(”/dev/graphics/fb0″, O_RDWR);
打开framebuffer设备,
- fbp = (char *)mmap(0, screensize, PROT_READ | PROT_WRITE, MAP_SHARED,fbfd, 0);
将设备map到一块内存,然后就可以操作这块内存空间来显示你想画的图形了。
最后别忘了关闭设备:
- munmap(fbp, screensize);
- close(fbfd);
效果图如下:

(emck) |

