织梦CMS - 轻松建站从此开始!

罗索

RGB565和RGB555位图显示

落鹤生 发布于 2010-05-05 15:38 点击:次 
The RGB565 color format is the same as the RGB555 color format, except that 6 bits are used for the green value instead of 5. Therefore, all 16 bits are in use. The organization of the pixels in the image buffer is from left to right and bottom up.
TAG:

 RGB565

  The RGB565 color format is the same as the RGB555 color format, except that 6 bits are used for the green value instead of 5. Therefore, all 16 bits are in use. The organization of the pixels in the image buffer is from left to right and bottom up.

  Memory Layout

  图1

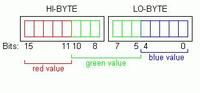
  As illustrated above, the 5 least significant bits of the WORD correspond to the blue value, bits 5 - 10 correspond to the green value and bits 11 to 15 correspond to the red value. Please note that on the x86 architecture WORDs are stored in little-endian order, which means the LOW BYTE is saved first. This is important when accessing the image data with a byte pointer.

  How to read and write pixel data

  A video capture device, video format, FrameHandlerSink with a MemBufferCollection, which defines the image data color format must first have been setup. The following code fragments show step-by-step how to access and manipulate the pixel data of RGB555.

  First of all, we have to capture an image. Otherwise, the image buffer would be empty. To do so, we start live mode and call Grabber::snapImages.

  Accessing the buffer

  The following code retrieves a pointer to the image data. Please note, that getPtr() returns a BYTE pointer, which will be type-casted to a WORD pointer. This makes it much easier to access the pixel data since RGB565 is a 16 bit color format.

  WORD* pwImgData = (WORD*) pActiveBuf->getPtr();

  In this example, we want to output the first (upper left hand) pixel of the image and manipulate the first 3. As previously mentioned, the image data is stored bottom up. Therefore, pwImgData points to the first byte of the first pixel of the last line in the buffer. To get access to this first byte, the following calculation has to be performed:


  1. // Calculate the index of the upper left pixel 
  2.  
  3. // Images are stored upside down in the image buffer 
  4.  
  5. // * 1: a pixel is 2 byte, but since we have a WORD pointer (which is also 2 bytes) 
  6.  
  7. // we count in pixel not in bytes 
  8.  
  9. SIZE dim = pActiveBuf->getFrameType().dim; 
  10.  
  11. int iOffsUpperLeft = (dim.cy-1) * dim.cx * 1; 

  At first, we retrieve the width and height of the image in terms of pixels. Then, the offset to the upper left pixel is calculated. Please note that we multiply with Width * 1 and not Width * 2. This is because we use a WORD pointer to access the image data. Of course, the multiplication by 1 is just for illustration and can be left out.

  (Height-1) * Width

  Now that we have the offset to the the first pixel, we can read it out:


  1. // Please note: RGB values are stored within a WORD in the following order: R,G,B 
  2.  
  3. // A binary AND operation is done with the color mask to extract the specific color. 
  4.  
  5. // After the AND operation, a right shift is done so that the output is displayed correctly. 
  6.  
  7. printf( "\nImage buffer pixel format is eRGB565\n" ); 
  8.  
  9. printf( "Pixel 1(RGB): %d %d %d\n", ( pwImgData[iOffsUpperLeft] & eRGB565_R ) >> 11, 
  10.  
  11. ( pwImgData[iOffsUpperLeft] & eRGB565_G ) >> 5, 
  12.  
  13. ( pwImgData[iOffsUpperLeft] & eRGB565_B ) ); 
  14.  
  15. printf( "Pixel 2(RGB): %d %d %d\n", ( pwImgData[iOffsUpperLeft+1] & eRGB565_R ) >> 11 , 
  16.  
  17. ( pwImgData[iOffsUpperLeft+1] & eRGB565_G ) >> 5, 
  18.  
  19. ( pwImgData[iOffsUpperLeft+1] & eRGB565_B ) ); 

  As seen in the code above, we perform a binary AND operation with the appropriate pixel mask on the current pixel to extract the color value. After that, the values for red and green must be shifted to the right to get the correct value (otherwise the value would be 2048 (32 times too big)).

  Manipulating Image Data

  Shifting is also important when assigning values. For example, if 7 is assigned to the red value, it must be shifted 11 times to the left. Instead of writing:

  // Assign 7 to the red value

  pwImgData[iOffsUpperLeft] = 7; // this is WRONG

  which assigns 7 to the blue value, the following code should be used:

  // Assign 7 to the red value

  pwImgData[iOffsUpperLeft] = 7 << 11;

  Another important thing to note is that the assignment above will overwrite the values for green and blue. To prevent this, the value must be ORed to the pixel data as the following code will show:

  // Clear the red value (set all bits to 0)

  pwImgData[iOffsUpperLeft] &= ~eRGB565_R;

  // Assign 7 to the red value without overwriting green and blue values

  pwImgData[iOffsUpperLeft] |= 7 << 11;

  Please note that all bits of the appropriate color should be set to 0, as the code above does. Consider, for example, that the previous red value could have been 16 (or 10000 binary). If we then perform a binary OR operation with 7 (or 111 binary), the result will be 23 (or 10111 binary). Therefore, it is better to set all bits of the appropriate channel to 0.

  Now we set the upper left hand pixel to red, the next to green and the third to blue.

  1. // overwrite the first 3 pixels and save image to disk 
  2.  
  3.   // set the first pixel to RED 
  4.  
  5.   pwImgData[iOffsUpperLeft] = 0; // clear the pixel 
  6.  
  7.   pwImgData[iOffsUpperLeft] |= 31 << 11; // Assign the value for red 
  8.  
  9.   // set the second pixel to GREEN 
  10.  
  11.   pwImgData[iOffsUpperLeft+1] = 0; // clear the pixel 
  12.  
  13.   pwImgData[iOffsUpperLeft+1] |= 63 << 5; // Assign the value for green 
  14.  
  15.   // set the third pixel to BLUE 
  16.  
  17.   pwImgData[iOffsUpperLeft+2] = 0; // clear the pixel 
  18.  
  19.   pwImgData[iOffsUpperLeft+2] |= 31; // Assign the value for blue 
  20.  
  21.   pActiveBuf->save( "RGB565.bmp" ); 

上面的都是废话,言归正传,要使用DirectDraw显示RGB565:

pixel格式设置是这样的
首先:pixel格式设置是十分重要的,设置不好,离屏面无法建立,以后的工作都是无用的了。像素格式设置

如下:

  1. DDPIXELFORMAT   overlayFormat;    
  2. ZeroMemory(&overlayFormat,sizeof(overlayFormat));    
  3.  
  4.      
  5.   DDPIXELFORMAT   PixelFormat= { sizeof(DDPIXELFORMAT),DDPF_RGB, 0, 16,
  6.        0xF800,0x07E0,0x001F, 0 };       
  7.   DDSURFACEDESC   ddsd1;   
  8.   ZeroMemory(&ddsd1,sizeof(ddsd1));   
  9.   ddsd1.dwSize   =   sizeof(ddsd1);   
  10.   ddsd1.dwFlags   =   DDSD_CAPS|DDSD_HEIGHT|DDSD_WIDTH|DDSD_PIXELFORMAT;   
  11.   ddsd1.ddsCaps.dwCaps   =   DDSCAPS_OFFSCREENPLAIN;   
  12.   ddsd1.dwWidth   =   nWidth;   
  13.   ddsd1.dwHeight=   nHeight;   
  14.   ddsd1.ddpfPixelFormat   =  PixelFormat;    
  15.                
  16.    HRESULT   ddral;   
  17.   ddral   =   pDD->CreateSurface(&ddsd1,&pVideoSurface,NULL);   
  18.   if(ddral   !=   DD_OK){   
  19.             MessageBox(NULL,   DXGetErrorString9(ddral),   "     ",   MB_OK);   
  20.   } 

其次:由于DirectDraw的显示顺序是从上到下,从左到右的方式,而BMP位图的数据存储方式是像素从下到上,从左到右,

所以要在位图数据拷贝到离屏面时要注意,否则显示出的图像是倒过来的。

具体如下:

  1. DDSURFACEDESC ddsd; 
  2. LPWORD lpSurface; 
  3. long Pitch; 
  4.  
  5. ddsd.dwSize = sizeof(ddsd); 
  6.  
  7. // 锁定Back Surface,DDraw中的Surface必须先锁定,然后才能访问 
  8. while((ddrval=lpDDSBack->Lock(NULL, &ddsd, 0, NULL))==DDERR_WASSTILLDRAWING); 
  9. if(ddrval == DD_OK) 
  10. // 起始地址指针,注意其类型是指向WORD的指针 
  11. lpSurface = (LPWORD)ddsd.lpSurface; 
  12.  
  13.                 
  14. // 我们关心的Pitch,其值是字节(BYTE)数 
  15. Pitch = ddsd.lPitch; 
  16. Pitch >>= 1; // 为了方便后面的计算,把它换算成字(WORD)数 
  17.  
  18. // 作了以上处理以后,像素坐标到地址的换算公式为 
  19. // (LPWORD)addr = lpSurface + y*Pitch + x; 
  20.  
  21. // 拷贝BMP数据到离屏面 
  22. int x, y; 
  23.  
  24. for(y=0; y<ScreenH; y++) 
  25. for(x=0; x<ScreenW; x++) 
  26. *(lpSurface + y*Pitch + x)=*(lpbmpdata +( ScreenH-y-1)*Pitch + x);
  27. //  lpbmpdata为字指针,指向的是位图的数据的指针。 

执行一下你的程序吧,如果成功,恭喜你!如何弹出非法错误,通过调试跟踪我们发现问题出现在上面的循环。可能大家都会知道这里的Pitch值在不同的电脑上的值是不一样的,一般情况下大家认为Plitch=ddsd.lPitch/2=ScreenW(当然这只是16位的情况),具体什么含义参考MSDN.如何Pitch的值大于ScreenW那么上面的操作肯定会发生内存溢出。所以修改为*(lpSurface + y*Pitch + x)=*(lpbmpdata +( ScreenH-y-1)*ScreenW + x);//  在什么电脑上都不会有问题了,除非你的显卡支持RGB555,不支持RGB565.

以上只介绍关键步骤,如需完整代码学习,请留言。

扩展阅读:

1.http://www.imagingcontrol.com/support/documentation/class/PixelformatRGB565.htm

(秩名)
本站文章除注明转载外,均为本站原创或编译欢迎任何形式的转载,但请务必注明出处,尊重他人劳动,同学习共成长。转载请注明:文章转载自:罗索实验室 [http://www.rosoo.net/a/201005/9338.html]
本文出处:百度百科 作者:秩名
顶一下
(3)
100%
踩一下
(0)
0%
------分隔线----------------------------
发表评论
请自觉遵守互联网相关的政策法规,严禁发布色情、暴力、反动的言论。
评价:
表情:
用户名: 验证码:点击我更换图片
栏目列表
将本文分享到微信
织梦二维码生成器
推荐内容